ST14BZ
WALL 7” x 13.8”
REVESTIMIENTO 18 x 35 cm
Each butt plate is served in 2 separate pieces
PLACEMENT
1.- PLACEMENT SUPPORTS.
For the correct placement, we will carry out a diagnosis of the support or surface taking into account: stability, compressibility of the intermediate layers, fullness, cohesion, water absorption capacity, texture, chemical compatibility and state of the placement surface that will receive the grip material. The surface to be covered must be flat, dry, and free of grease, oil or powder and have adequate stability. It is very important to respect the adequate setting and maturation times of the supports so that they can correctly support the loads and avoid possible tensions and structural movements that could be transmitted to the upper layers.
2.- PLACEMENT.
Porcelain stoneware will be installed using the thin layer technique using cementitious adhesives or reaction resin adhesives. The use of the thick layer technique with traditional mortars is not recommended, since the very low water absorption capacity of porcelain does not guarantee adherence.
2.1. GENERAL REQUIREMENTS.
Type C2 cementitious adhesives will generally be used, especially outdoors and on unconventional supports. Layer of the bonding material between 5 and 10 mm maximum thickness. It is necessary to apply with a notched trowel to ensure the homogeneity of the layer. Supports with flatness type I (deviation< 3 mm measured on a 2 m ruler). The adhesive must be protected from rapid drying. It is not recommended to moisten the tile with water.
2.2. ENVIRONMENTAL CONDITIONS.
The application must be carried out when the ambient temperature, the temperature of the support and that of the materials are between 5 °C and 30 °C. Wind speed not higher than 50 km/h. Avoid rain in outdoor placement.
2.3. PREPARATION OF ADHESIVES.
Cementitious adhesives:
It is prepared according to the manufacturer’s instructions, with suitable tools and clean water. Knead with a mixer at low revolutions until a homogeneous and creamy lump-free paste is obtained. It will be used within the shelf life period, and should not be remixed with additional water. The amount of mass produced will be adjusted to consumption according to the placement speed and environmental conditions. Dispersion adhesives: They are usually marketed in the form of a paste, ready to be used. Reaction resin adhesive: They are prepared following the manufacturer’s instructions. It is vitally important to use the components in their proper proportions. Make a good mixing in order to obtain a homogeneous mixture. The use of a mixer with a helical mixer is recommended. It is important to prepare and apply these materials within the temperature range proposed by the manufacturer (between 10 and 25°C).
2.4. SIMPLE GLUING.
The selection of the trowel depends on factors such as the type of installation, the flatness of the installation surface, the dimensions of the tile and the type of adhesive to be used. The adhesive is spread over the installation surface and the appropriate amount is combed with a specified trowel. It is important to ensure that the installation is carried out within the open time of the adhesive to prevent the formation of a dry film that impairs adhesion. The ceramic tile is placed on the adhesive layer by means of a sliding movement until the grooves are completely flattened, which guarantees the solidity and correct adherence of the entire surface. Pressure can also be applied with a rubber mallet.
2.5. DOUBLE GLUED.
It will be used in: Exterior coatings and pavements. Laying of tiles with a format greater than N 35×35 cm or equivalent surface. Interior flooring subjected to significant dynamic and static loads. To apply it: On the one hand, the adhesive is spread over the installation surface with a notched trowel and on the other, the adhesive is spread on the back of the tile with the trowel or trowel, or on the straight side of the trowel. The final thickness of the adhesive must not exceed the maximum recommended thickness. Ceramic tiles are laid before the 13:50 formation of a dry film on the surface of the adhesive.
2.6. PLACEMENT OF TILES.
Before proceeding with its placement, it is necessary to extract several pieces from different boxes and verify by plating an 8 to 10 m2 carpet to see the effect, tonality, caliber and dimensions. The tiles must be placed with straight and regular joints between them. The width of the joint depends on the format of the tile and the foreseeable use and effort to which the installation will be subjected. The use of an installation joint of less than 1.5 mm is not recommended. In no case can it be placed without a joint. Within the adjustment time, it is recommended to lift a tile to check if the required contact surface is being achieved. Excessive adhesive must be removed from the joints before it hardens for proper grouting. For rectangular formats, the interlocking will be done at a MAXIMUM 15% of the length of the piece. We must protect the newly installed ceramic finish from inclement weather, frost and premature drying. The products must be carefully handled, avoiding bumps between pieces when dragging the pieces one over the other to avoid damaging the edges and scratches on the surface. Once the material is placed, it is essential to protect it correctly, in order to avoid possible damage until the work is finished. We supply this material with a wax protection for handling when placing it, said wax is removed by cleaning it with hot water.
3. MOVEMENT JOINTS.
3.1. STRUCTURAL JOINTS.
They must be respected in their entire length and width, involving all the layers that make up the coating system. In the case of manual execution, the sealants must have a minimum deformity of 15%.
3.2. PERIMETER JOINTS.
They will reach deep to the base support or, at least, the layer that acts as decoupling. They will have a minimum width of 6 mm.
3.3. INTERMEDIATE JOINTS.
In interior spaces, divide the total surface with intermediate joints every 40 m? maximum and outdoors every 25m?. They penetrate in depth just like the intermediate joints. Its width is established based on the entity of the expected movements.
4. GROUTING.
The grouting will be carried out after at least 24 hours from the placement of the ceramic pieces. The application of the grouting material will be carried out according to the manufacturer’s instructions. Generally we will use a CG2 type grouting material. For cases in which high mechanical resistance, watertightness and chemical resistance are required, we will use RG1 type grouting material. The grouting paste will be spread using a suitable rubber trowel, filling the joints to their full depth with diagonal movements.
CLEANING.
For a correct finish of the ceramic coating, it is necessary to proceed to the final cleaning of the work. In this way, the remains of cement, joint sealing materials and any other residue will be removed. To do this, use slightly acidic descaling detergents diluted with water and keep them in contact with the glazes for a short time.
DO NOT USE CLEANING AGENTS THAT CONTAIN HYDROCOLOR OR HYDROFLUORIC ACID AND ITS DERIVATIVES.
It is convenient to impregnate the surface with clean water prior to any chemical treatment to avoid possible absorption of the agents used by the grouting materials. These types of products should not be used on newly installed tiles as the acid reacts with unset bonding and joint sealing materials.
THE COMPANY WILL NOT BE RESPONSIBLE FOR THE MATERIALS ALREADY PLACED.
To facilitate cleaning and proper use of our materials, we recommend the use of mats at entrances and it is advisable to keep the floor as clean as possible to obtain good results.
CLAIMS FOR PROBLEMS ARISING FROM NON-COMPLIANCE WITH THESE PREMISES WILL NOT BE ADMITTED WHEN THE MATERIAL IS ALREADY PLACED.
MIXTURES OF STONE AND GLASS
1.TECHNICAL AND USE INFORMATION.
Low resistance to chemical attack.
Dimensional tolerance of the ceramic base: +0.6%
Good resistance to attack by microorganisms.
Preferably for use as an interior lining.
Variable tone.
Do not store in humid areas.
2. SURFACE PREPARATION.
It is essential that the laying wall is perfectly clean, dry and level.
3. GRIP MATERIAL.
For a perfect grip, C2 glue cement or epoxy adhesives must be used, following the manufacturer’s instructions at all times.
4. PLACEMENT.
Spread a thin layer of adhesive on the surface and place the piece before the adhesive begins to harden. Adhesive residue must be cleaned before it hardens using a damp sponge.
5. GROUTING AND CUTTING.
Make sure the adhesive is completely dry before grouting. For grouting, follow the instructions of the manufacturer of the paste used. Use a sponge and water to clean up any remaining paste.
6. CLEANING AND MAINTENANCE.
Use water or neutral detergents with a sponge. In no case use abrasive or anti-limescale products.
PRECIOUS STONES
1. TECHNICAL AND USAGE INFORMATION.
Low resistance to chemical attack.
It is only used as a lining.
100% natural.
Wide variety of shades and colors.
2. SURFACE PREPARATION.
It is essential that the laying wall is perfectly clean, dry and level. It is recommended to paint the wall white to minimize the visualization of the adhesive. When placed in areas with water, the wall must be previously waterproofed.
3. GRIP MATERIAL.
The use of H40 is recommended, since this material serves both as a bonding glue and as a grouting paste.
4. PLACEMENT.
The material must be perfectly clean and dry both on the surface in contact with the glue and on the front face. The pieces are glued without taking into account the joints, they must be in contact.
The adhesive must be distributed in the corners and the center of the piece. Once the piece is placed, move it a little on the wall to fill empty holes. If you find a gap between the meshes after placement, cover the gaps with loose pieces for a good finish.
5. GROUTING AND CUTTING.
For grouting you can use standard grouting paste.
6. CLEANING AND MAINTENANCE.
Use water or neutral detergents with a sponge. In no case use abrasive or anti-lime products.
SPECIFIC CHARACTERISTICS
METALS
Do not place on wet surfaces for a long time.
RESINS
Use recommended for interiors, do not expose directly and prolonged to sunlight.
PAINTED STONES.
For cleaning, wash with a damp cloth, do not clean with abrasive materials.
NATURAL ECHO
Use recommended for interiors, prolonged contact with water is not recommended.
SYMBOLOGY
Placing ANJASORA products is very simple. By following these simple guidelines, anyone can do it.
It is installed stone by stone, it does not have joints and it is easy to clean. It is essential to place this material with special glue for stones.
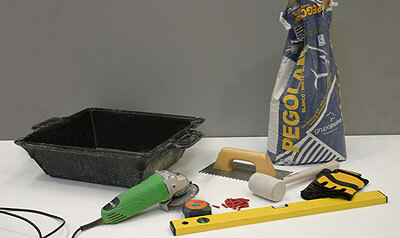
1. Prepare the glue, according to the manufacturer’s instructions and clean the surface. We will also need a rubber mallet, a notched trowel, a level and a radial grinder.
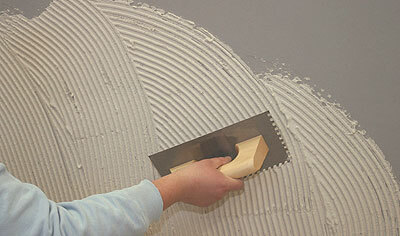
2. Spread the glue on the wall with the trowel to level the surface and achieve a perfect grip. For this operation we will always start from the bottom of the wall towards the top. If the wall has corners, start with them to avoid making closures or possible cuts at the end of the installation.
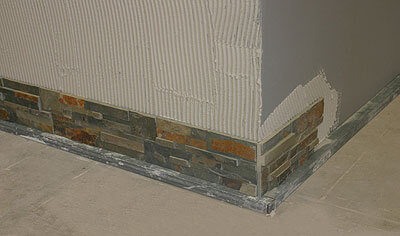
3. Before placing the first stone, the first level must be taken to ensure the correct alignment of the stone.
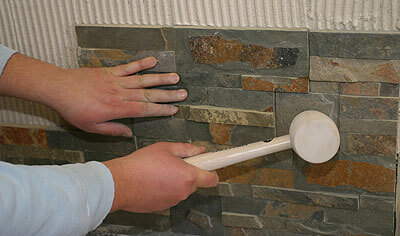
4. Hit each stone with the rubber mallet to secure the grip.
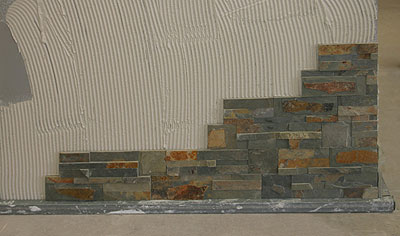
5. Shim as row placement progresses toward the top to level surface. Always placing the level at the beginning of each row.
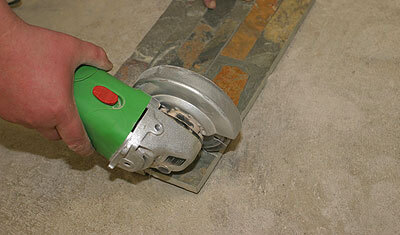
6. If you have to make any cuts in the stones, use a radial cutter with a vidia disc.